
One of the biggest mistakes in digital course co-production is underestimating how much planning and coordination is needed. Without a clear timeline, even the best course idea can turn into chaos.
As a co-producer, part of your role is to lead the schedule, organize the workflow, and ensure that every task — from content creation to launch emails — happens at the right time.
In this article, you’ll learn how to create an efficient, realistic, and flexible production timeline to guide your first (or next) co-production from start to successful launch.
Why a Timeline Matters in Co-Production
In digital course creation, many tasks are interdependent:
- The landing page needs the course name
- The ads need the bonus list
- The emails need the checkout link
- The expert needs time to record after you finish the outline
Without a timeline, things get delayed, rushed, or forgotten — and that leads to:
- Poor launch performance
- High stress for both partners
- Confused or disappointed students
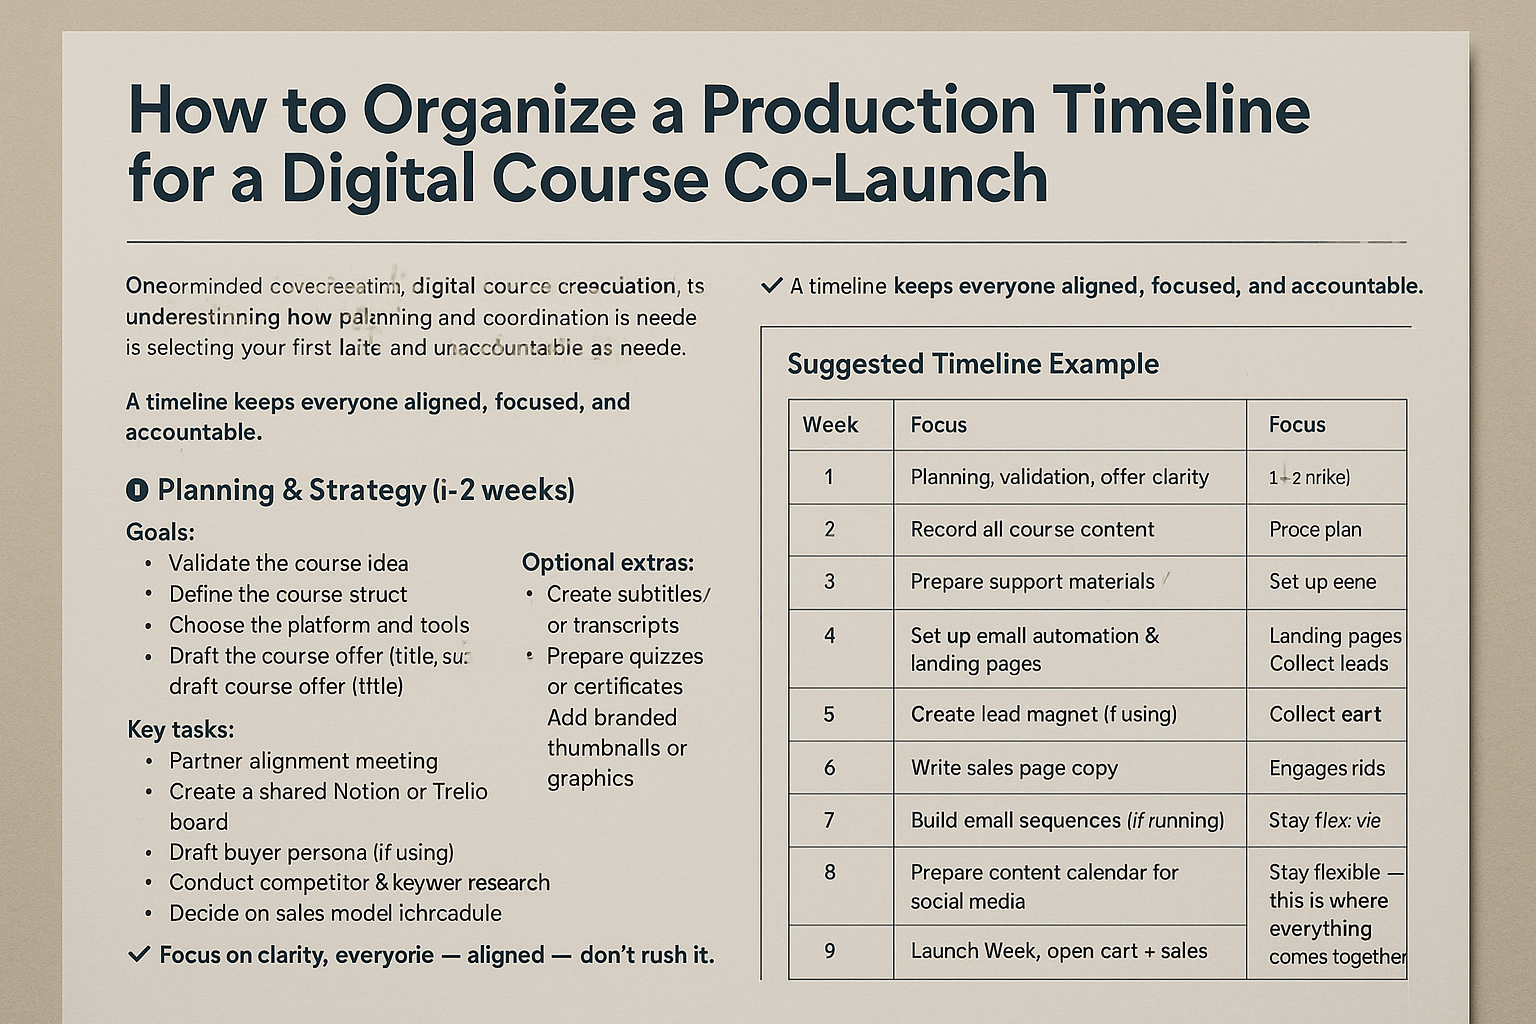
✅ A timeline keeps everyone aligned, focused, and accountable.
The 4 Phases of a Co-Production Timeline
Let’s break the process down into four clear phases. Each phase has tasks you’ll be responsible for coordinating.
Phase 1: Planning & Strategy (1–2 weeks)
Goals:
- Validate the course idea
- Define the course structure
- Choose the platform and tools
- Outline the timeline and responsibilities
- Draft the course offer (title, subtitle, promise, bonuses)
Key tasks:
- Partner alignment meeting
- Create a shared Notion or Trello board
- Draft buyer persona
- Conduct competitor and keyword research
- Decide on sales model (live launch, evergreen, etc.)
✅ This is the foundation of your project — don’t rush it.
Phase 2: Content Production (2–4 weeks)
Goals:
- Record all course content
- Prepare support materials
- Review and organize everything for the platform
Key tasks:
- Script or outline each module
- Schedule recordings with the expert
- Oversee editing (video/audio/slides)
- Upload to course platform
- Test every lesson and attachment
Optional extras:
- Create subtitles or transcripts
- Prepare quizzes or certificates
- Add branded thumbnails or graphics
✅ Focus on clarity, quality, and keeping the expert on schedule.
Phase 3: Launch Preparation (2–3 weeks)
Goals:
- Create the marketing funnel
- Set up email automation and landing pages
- Schedule content and paid ads
- Collect leads
Key tasks:
- Design lead magnet (if using)
- Set up lead capture landing page
- Write sales page copy
- Build email sequences
- Prepare content calendar for social media
- Setup Facebook Pixel, Google Analytics, or Hotmart tracking
- Plan webinar or live event (if using)
✅ Have all funnel elements tested and in place before launch week.
Phase 4: Launch Week (5–10 days)
Goals:
- Open cart and drive sales
- Handle customer support and objections
- Monitor performance and adjust as needed
Key tasks:
- Send daily launch emails
- Monitor ad campaigns (if running)
- Answer DMs and email questions
- Encourage testimonials and feedback
- Offer urgency elements (bonuses, countdowns, etc.)
- Update team daily on results
✅ Stay flexible — this is where everything comes together.
Suggested Timeline Example (7-Week Plan)
| Week | Focus |
| 1 | Planning, validation, offer clarity |
| 2 | Course outline, recording prep |
| 3 | Content recording begins |
| 4 | Finalize recording, start edits |
| 5 | Upload content, test platform |
| 6 | Funnel setup + email scheduling |
| 7 | Launch week: open cart + sales |
You can condense or stretch this plan depending on the course scope and expert availability.
Tools to Help You Manage the Timeline
Here are some tools that make timeline management smoother:
- Notion: Central dashboard for planning and checklists
- Trello / ClickUp / Asana: Task boards with deadlines and team assignments
- Google Sheets: Timeline overview with dates, responsibilities, status
- Slack or WhatsApp: Real-time updates and communication
- Loom: Record video feedback for async collaboration
✅ Share updates weekly to avoid surprises and bottlenecks.
Pro Tips for Staying on Track
- Use color-coded status (e.g., Not Started, In Progress, Done)
- Set soft deadlines with buffer time for reviews
- Always plan for delays — real life happens
- Prioritize tasks that affect other team members
- Keep the expert informed, but don’t overwhelm with detail
- Build reminders into your system (e.g., weekly check-ins)
What to Do When the Timeline Falls Apart
Even with the best planning, unexpected issues happen: a sick expert, tech problems, missed recordings.
Here’s how to handle it:
- Pause and review: What is the immediate priority?
- Reprioritize: Focus on what will impact the launch most
- Communicate clearly: Update your partner calmly and honestly
- Compress where needed: Can an email go out without graphics? Can a module be recorded later?
✅ A flexible mindset + strong structure = resilience.
Final Thoughts: Timeline = Trust
As a co-producer, your timeline isn’t just a project plan — it’s a tool for trust.
When you keep things on track, your expert sees you as a pro. Your audience gets a better experience. And your chances of a successful launch grow exponentially.
So plan well, stay agile, and remember: clarity beats speed.